This is the continuation of Lab 001 – Solving a simple use case with Azure Functions – Part 1, where I created a working local prototype for a use case, enabling me to query a public API for a stock price and display the information at the console.
Now, I will move this code to the cloud using Azure Functions, so that I can run it whenever and from wherever I want.
Setting up the prerequisites
To start with Azure Functions, I will need:
- a working Azure subscription, of course
And several tools to develop the code:
- Visual Studio Code (got that already)
- Python 3.7-3.9 (got that already)
- Azure Functions Core Tools (version 4.x)
- The Python Extension for Visual Studio Code
- The Azure Functions Extension for Visual Studio Code (version 1.8.3 or later)
Azure Subscription
I already have a working Azure subscription, and you can create an account for free, to start with yourselves.
Azure Functions Core Tools
Let’s install the Azure Functions Core Tools (version 4.0.4785 or later).
I’m running this lab on Linux Mint 21, which is based on Ubuntu 22.04. Unfortunately, the official instructions for installing Azure Function Core Tools do not cover my environment. I had to revert to an alternative way of installing it, based on info found at https://github.com/Azure/azure-functions-core-tools/issues/3037:
wget -q https://packages.microsoft.com/config/ubuntu/22.04/packages-microsoft-prod.deb
sudo dpkg -i packages-microsoft-prod.deb
sudo apt update
sudo apt install azure-functions-core-tools-4
Visual Studio Code and Extensions
I have already installed Visual Studio Code to work with the local prototype, and also Python Extension.
Next, I will install the latest Azure Functions Extension, which will also automatically install Azure Account Extension and Azure Resources Extension.
Initialize a local Azure Functions project
To turn our little project into an Azure Function project, we need to create some files, that are needed for any new Azure Functions project:
host.json: configuration options affecting all functions in an app instancelocal.settings.json: settings for local deployment, analogous to those that are stored in Azure function app.vscode/extensions.json: settings for Visual Studio Code.gitignore: list of files that will not be included in source control
To easily create those files in the existing project, I will invoke Azure Functions Core Tools in my project directory:
func init
This is the output of the command:
Select a number for worker runtime:
1. dotnet
2. dotnet (isolated process)
3. node
4. python
5. powershell
6. custom
Choose option: 4
python
Found Python version 3.10.6 (python3).
requirements.txt already exists. Skipped!
Writing getting_started.md
.gitignore already exists. Skipped!
Writing host.json
Writing local.settings.json
Writing .vscode/extensions.json
The command asked me to specify which worker runtime I wish to use, so I chose python. It then created the above JSON files, but it did not create the .gitignore and requirements.txt files, since I already had them from working with the local prototyping.
Not to worry, I renamed these two files, I run the command again so that new files were created, and I manually merged the contents of the new ones with my previous settings. The only change worth mentioning is the following in requirements.txt:
# Do not include azure-functions-worker in this file # The Python Worker is managed by the Azure Functions platform # Manually managing azure-functions-worker may cause unexpected issues azure-functions
And in.gitignore:
local.settings.json
Next time, I might initialize my project as a Functions project from the start, so that all those files are in place, and build my prototype afterwards. Either way, I welcome the opportunity to dig in and understand what a scaffolding tool does, instead of just blindly accept and use the results.
Let’s see the content of the JSON files:
host.json:
{
  "version": "2.0",
  "logging": {
    "applicationInsights": {
      "samplingSettings": {
        "isEnabled": true,
        "excludedTypes": "Request"
      }
    }
  },
  "extensionBundle": {
    "id": "Microsoft.Azure.Functions.ExtensionBundle",
    "version": "[3.*, 4.0.0)"
  }
}
local.settings.json:
{
  "IsEncrypted": false,
  "Values": {
    "FUNCTIONS_WORKER_RUNTIME": "python",
    "AzureWebJobsStorage": ""
  }
}
.vscode/extensions.json:
{
    "recommendations": [
        "ms-azuretools.vscode-azurefunctions",
        "ms-python.python"
    ]
}
Create a new Function
I will now create a new Function with Azure Functions Core Tools:
func new
This command will ask me for the template I want to use, and a name for the Function. Since I want to trigger this function from my browser, I will choose the template HTTP trigger. As for naming, I will just name my Function HttpTrigger1. This will be just a test, so I can always rename it later, or create a new one.
I could also create the new Function, and specify those parameters at the same time, passing the corresponding parameters, like so:
func new --template "HTTP trigger" -name HttpTrigger1
This creates a new folder HttpTrigger1 with the following structure:
HttpTrigger1/
├── function.json
└── __init__.py
function.json contains the configuration of the Function.
__init__.py contains a skeleton implementation of the Function, which is basically just a python function called main that takes as input the HttpRequest (GET or POST) that triggered the Azure Function, extracts the parameters, and returns an HttpResponse that contains some informational messages.
import logging
import azure.functions as func
def main(req: func.HttpRequest) -> func.HttpResponse:
logging.info('Python HTTP trigger function processed a request.')
name = req.params.get('name')
if not name:
try:
req_body = req.get_json()
except ValueError:
pass
else:
name = req_body.get('name')
if name:
return func.HttpResponse(f"Hello, {name}. This HTTP triggered function executed successfully.")
else:
return func.HttpResponse(
"This HTTP triggered function executed successfully. Pass a name in the query string or in the request body for a personalized response.",
status_code=200
)
Write the implementation of the Function
Let’s start with something quick and dirty by changing the default code in the main function and calling our simple prototype:
import logging
import azure.functions as func
import stock
def main(req: func.HttpRequest) -> func.HttpResponse:
logging.info('Python HTTP trigger function processed a request.')
symbol = req.params.get('symbol') # only support GET for now
if symbol:
data = stock.get_stock_data_from_api(symbol)
return func.HttpResponse(
body=stock.view_as_html(data),
mimetype='text/html',
status_code=200
);
else:
return func.HttpResponse(
"Please pass a symbol in the query string for a meaningful response.",
status_code=200
)
Run the Function locally
I run the Function locally using Azure Functions Core Tools:
func start
This will create a local web service that will listen on a URL like this one:
http://localhost:7071/api/HttpTrigger1
If I invoke this URL with a browser, I get the following response:
Please pass a symbol in the query string for a meaningful response.
I didn’t specify the desired symbol, so I need to call it again properly, like so:
http://localhost:7071/api/HttpTrigger1?symbol=MSFT
And now, I get the answer I was looking for!
MSFT: $257.22 (+0.12%)
14/12/2022 23:00:04 EET
This is the joy of having a properly tested prototype: There is no need to debug the same code again. If you have already tested the business logic and you honor the interface, you can just focus on integrating the code with the specific environment 🙂
Now might be a good time to commit my code, as I have a working Azure Function prototype running locally, so I do that:
git add . git status On branch main Your branch is up to date with 'origin/main'. Changes to be committed: (use "git restore --staged <file>..." to unstage) modified: .gitignore new file: HttpTrigger1/__init__.py new file: HttpTrigger1/function.json new file: host.json modified: requirements.txt git commit -m "Azure Function running locally" git push
Publish to Azure
Let’s prepare for making the newly created Azure Function worthy of its name by sending to to Azure!
First, I create the file .funcignore to make sure that no unnecessary files get uploaded to Azure:
.vscode/
.venv/
tests/
local.settings.json

test_api_sample_msft.json
test.py
get_stock_price.py
getting_started.md
README.md
Then, I need to sign in to Azure via the Visual Studio Code Azure Account Extension that was installed earlier:
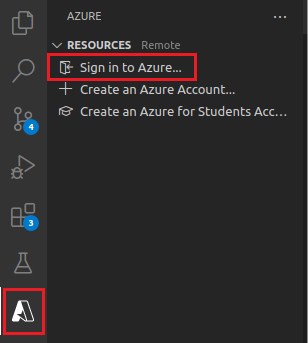
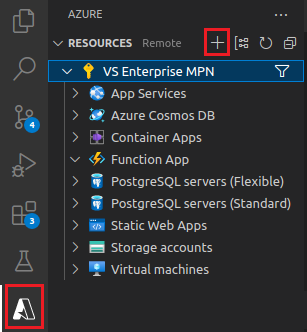
After signing in, I can see an overview of my Subscription and resources, from where I can create a new Azure Function App:
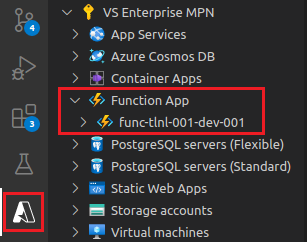
I create an Azure Function App named func-tlnl-001-dev-001 to my subscription, following the prompts, until it’s ready. I can see it later by refreshing the subscription view in Visual Studio Code:
I can now move on and publish my local Function to Azure:

Following the prompts, I chose my previously created Azure Function App as the target. It takes some time but eventually my function is published:
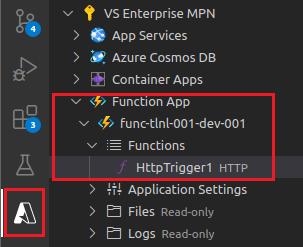
Calling the Azure Function
By right-clicking on the HttpTrigger1 Function above, and selecting “Copy Function Url” I now have the full URL of my published Azure Function!
https://func-tlnl-001-dev-001.azurewebsites.net/api/httptrigger1?code=_6WLYYNxyFEhNaCJ3krbTJ7Gd9vZxqxFdiMk3z_3mwdIAzFuBp-CAQ%3D%3D
I can put this in my browser, and see that it works:
Please pass a symbol in the query string for a meaningful response.
Let’s append the symbol parameter to see the final result:
https://func-tlnl-001-dev-001.azurewebsites.net/api/httptrigger1?code=_6WLYYNxyFEhNaCJ3krbTJ7Gd9vZxqxFdiMk3z_3mwdIAzFuBp-CAQ%3D%3D&symbol=MSFT
Voila! I now have a working and published prototype of an Azure Function!
Let’s commit the code again:
git add . git status On branch main Your branch is up to date with 'origin/main'. Changes to be committed: (use "git restore --staged <file>..." to unstage) new file: .funcignore git commit -m "HttpTrigger1 running on cloud" git push
Notes on Azure resources deployment
An important take from this exercise so far, is that all necessary resources in Azure for running my Azure Function were created and configured without ever touching the Azure portal. Everything was done from within Visual Studio Code, with the help of the Extensions that we have installed in the beginning.
Of course, this is not the only way to do this. I could always use the portal to create the resources, create everything from the Azure CLI, or create an ARM/bicep template and use this to deploy the resources.
In a real life scenario, especially in a production environment, I would most likely avoid manual methods. I would prefer to use templates for creating the resources, to have fine control over the configuration and ensure repeatability of results.
This might actually be the subject of another Lab, dealing with Infrastructure as Code, so I’ll keep a note on that 🙂
Let’s move on
Now, the HttpTrigger1 function is working fine, but let’s consider some issues:
Each time the function is called, it queries the backend API. This is acceptable for my lab, but not in a real case scenario where such a function might be publicly available and (possibly) popular. In such a case, there might be hundreds or thousands of requests per second and I would not want to query the backend API so often.
Apart from the fact that stock prices do not usually change that much from second to second, I would prefer to “protect” the Finance API from spamming, while keeping the data as updated as possible. Let’s say that I would not want to query the backend API more that once every 15 seconds (for the same stock).
Implementing this advanced functionality will be the subject of Lab 001 – Solving a simple use case with Azure Functions – Part 3.